Translate

Thursday, June 23, 2016

We Are All Mad Here:Alice ATC Mini Album

With the new Alice movie that just came out, I have
seen alot of ideas with Alice themes and just have
fallin in love with all the creations that I have seen.

I too decided to make a Alice themed project and just
absolutely love the Alice in Wonderland "We are All Mad Here"
paper pocket letter from Sherri Baldy My Besties.


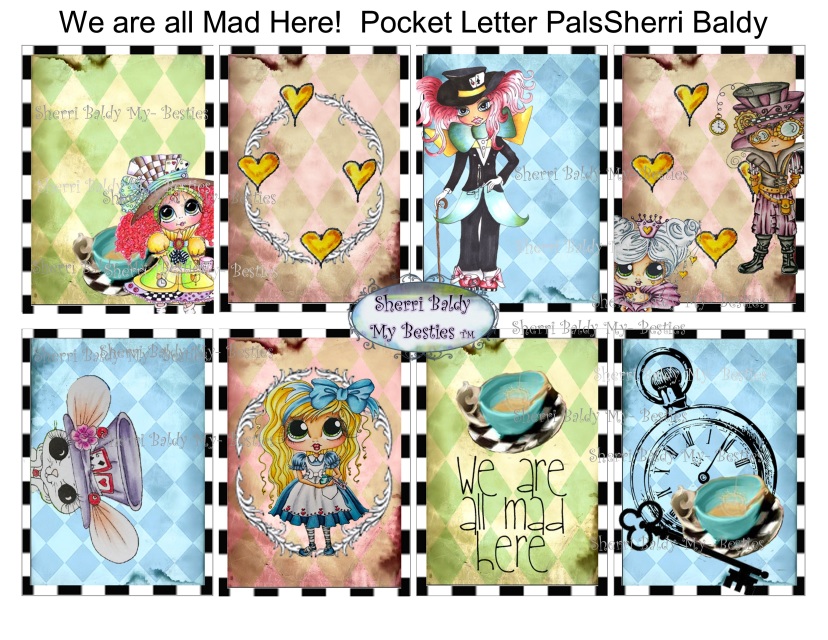
I also like the "Steampunk" paper pocket letter that looks
like playing cards.  They are so fun looking.


I decided to make a ATC sized Mini Album with
both of these paper pocket letter printables.  You just print and cut out
and you have your panels ready to go and decorate.


The size for the outside is 2 3/4" x 3 3/4" with the spine of 1 3/8".

The album has 4 pages with small elements on each one.

Here is the inside cover and page 1. 
I have made a video that I will post at the bottom here
so you can see how all the elements work.


Back side of page 1 and front of page 2


Back side of page 2 and front of page 3


Back side of page 3 and front of page 4


Back side of page 4 and back cover


For this album I have done a few charms with Shrinky Dinks.
I remember playing with shrinky dinks when I was a little girl
and was just over the moon when I found it at Michaels so
you could make your own designs and shrinkies.


I took one of the pocket letter printables and printed on the shrinky
sheet along with the bottle image.  I colored the bottle image
with colored pencils and popped them in the oven.  
Just remember that they shrink.  There is a chart to help
you decide what size to print before shrinking to get the size you want.


I only used to images from the "Steampunk" 
paper pocket letter for the front of my album.
Love the look of playing cards.
The bottle is the same bottle I used for the charm.  I just
cut the Drink Me part off of the charm before shrinking.


Here is the video so you can see how it all works.


There are more Alice themed printables and digis
available from MyBestiesShop.com

You can find them all HERE


Hope you have enjoyed todays little mini.

See you next time.


Tuesday, June 21, 2016

Perpetual Calendar-Let's Make One

What do we have for you today?

Why not make a perpetual calender to sit on your desk or
in your craft room.  I have made this one with the
New Pink Flower Power Designer Papers and printable
from Sherri Baldy My Besties, and will show you how
to make one for yourself.


Let's have a look at what I have used and how to make one for yourself.


Here is the paper pack that I used to decorate my calendar
You can find it HERE


The printable I used to add the topper matches the paper pack.
You can find it HERE

Right now you can get both of these and many more for 50% off
with coupon code

YOURSPECIAL50

for all printables and digis at MyBestiesShop.com


I started with making my cubes by using a 8.5 x 11 sheet of cardstock.  One
sheet per cube.  I am sure you can find other cubes templates, I just
learned to make them this way so please excuse my diagrams.


Score at 1/2", 3", 5 1/2" and 8' with the 8 1/2" side on the top.
 Turn the cardstock so the 11" side is on top and score 
at 1/2", 3", 5 1/2", 8" and 10 1/2"

You need to add a score line on 2 of the flaps to make tabs to glue
your cube all together.  Follow the diagram and cut all the areas
out to leave you your cube base.
This is just the way I learned to do cubes, but sure there are many 
other ways.  My cubes have a cube face of 2 1/2" when assembled.

I cut my paper to at 2 1/4" to decorate each of the cubes. 6 per cube.


I also cut a white panel to hold my numbers. 
I used my Cricut cutting machine to cut these.

Here is the numbers you will need for each cube so
you have the right numbers to cover each day of the month.

Cube 1: 0, 1, 2, 3, 4, 5
Cube 2: 0, 1, 2, 7, 8, 9

I used the Cricut font to cut these out.

Make sure to use a die, font (if printing numbers) that has a 9 or 6 that can be
flipped over to use as the 6 and 9 together.

I distressed all the edges before putting together.


The base is from cardstock cut at 5 3/8" x 11"


Score on the 11" side at 1/2", 2 1/2", 3 1/8", 5 7/8"

You want the bottom of the stand to slope
down in the back for the cubes to sit at a slight angle.


To add a support and help hold the cubes on the stand, I took a piece of cardstock
2 7/8" x 10 1/2"


With the 10 1/2' side on top, score at 2 3/4", 8"
I added a 1/2" score line on one of the side of  to use as
tabs to attach to the bottom of the base.
Follow the diagram to cut the side panels.


This is how I attached the support panel.  Wrap around and secure
the tabs to the bottom and the back to the panel.


Now you are ready to decorate and add all your goodies.
I started with adding a Spellbinders Labels 25 die cut to hold
my printable and any embellishments.


I cut my printable on a Spellbinders loopy oval and threaded
organza ribbon through the loops and added a bow on the top.


The flowers I have used are

and

Both can be found in the


I have added a small clothes pin to the back on one side
to hold the name of the months.  
Just print the names of your months and
use a punch or die cut to cut them out.


Hope you have enjoyed todays project.


Wednesday, June 15, 2016

A Walk Down Memory Lane


Hello Everyone!

Today I would like to revisit a past project.  I love to go back
and revisit older projects and remember the joy that was
spent with making it.

As we are using this digi over at My Besties International, I felt
it would nice to see her again and share with you what I did with her.

Come on over and visit and check out all the creations.

Besties Challenge


Here is a cute way to hold a post-it note pad on your desk.


I started with a 6x6" base card and scored at 5 3/4" and at 6 1/4" to allow
 for the card to lay flat when closed to accommodate for the box.  I then scored the front
 of the card to make the easel.  The box is made with a 4x4" piece of
 cardstock and scored at 1/2" on each side.    I cut the front panel at 5x5"
 and centered in the front of the card base, making sure to only add adhesive to
 the bottom half of the panel.
Sentiment was framed on a Spellbinders die S5-218 Card Creator.

I used DCWV paper pack in The Preppy Princess Stack.

I used a Sherri Baldy My Besties Fancy Pants 


I used copic markers to color her and bring her to life and  framed her on a
 Spellbinders die Labels 25 .
When I original  did this one, I forgot to write down what copies I used for her.


I added silk flowers using this technique
and paper roses using a 6 petal flower punch in various sizes.


Thanks for walking down memory lane with me!!


Thursday, June 9, 2016

You Are One in a Melon: Side Step Card

Hello everyone! 
What do I have for you today!!

Today I would like to share with you a summer themed
side step card with a pop of color from her dress.


Today I have for you this little gem and cutie
from Sherri Baldy My Besties


I wanted something fun for her so I decided to start
with a side step card and some cute watermelon paper pieced embellishments


I love how simple the cut is for the side step and all
the possibilities of adding so many little goodies
to go with your image.

Here is the template I used to make my base

    Our Daily Bread designs Blog: Techniques, Tutorials and Tips - Side Step Card!:
    This is one that I have saved for reference for all the measurements.
    I started with Recollections cardstock for my base.


I cut my watermelon and sentiment on my cutting machine.  Love
that you can adjust the size to fit with your project

Added some ribbon on the bottom of the front fold in yellow tones
for a small added pop of color along with the twine bow.


I printed my image at original size and cut her out with 
Spellbinders nestabilities labels nine in the largest die
Cut around where it would emboss and then cut a second in the
green to mount her on.

What colors did I use to color her?
I have used copics
Skin:  E50, 51, 53 and RV21 for checks
Eyes: 32, 39 and B00
Watermelon:  R32, 35, 56   and  RV 29
Dress and hat:  YR 07, 15, 16, 20  and  Y00
Greens: YG11,17, 41 and G21


I hope today I have sparked you creative juices

You can find more delightful little images in a variety of themes at


Wednesday, June 1, 2016

Full of Flowers and Giveaway

Hard to believe  June is here and boy is it looking
beautiful outside with the trees full of leaves and flowers popping
their wonderful color out and making it all so beautiful.

My Besties International is ALL ABOUT FLOWERS
this month with a NEW OPTION.
It is now open to all with a ANYTHING GOES and the option
of our theme with a Besties.

What did I create for you this time!!!!


I am using Flower Hat Girl


I also have some Blog Candy today that I will be giving away.

What do you have to do?

Be a follower of my blog

Visit My Besties International Blog and leave a comment
on the blog that I sent you.

and come back here and leave me a comment.

I will be giving away 2 different items.


First, we have a My Besties Stamp

and

*****I use this and am absolutely in love with it.*****


Let me know which one you are wanting a chance to win,
 if both, just put both in your comment here letting me know you
have done all of the above!!!!!

I will announce the winners, which will be picked by random,
in my post here for July for My Besties International Challenge.


Challenges I would like to enter:

Happy crafting and good luck to all!!!!!

xoxo